Last Sunday was a beautiful Wintring morning. Since we haven't really had Winter yet, except for a couple of days, and it was nice and warm like Spring, and it's after January first, I'm making up a new word and calling it Wintring.
I woke up early. The sun was shining. The birds were singing. The tank is clean...
Anyway, I had an urge to bake something with peanut butter. The child did not want muffins. He wanted eggs and sausage. So no peanut butter there.
I didn't want to make just any old peanut butter cookies. I wanted something different. So I went to my good friend Google, and Google led me to these. They are quite easy to make, and it's a good recipe. I substituted organic red fife flour for the whole wheat flour, which added an extra nutty taste, and organic peanut butter for that crap that they make with hydrogenated peanut oil and shitloads of icing sugar.
In the middle of rolling the cookies for the cookie sheets, my BBM went off. Normally I would have just waited until I was finished, but I was expecting some news during the weekend, and unfortunately, it was the sad news that we had anticipated. I had one batch in the oven, and a second batch on a second tray nearly ready to go. There was still some dough remaining in the mixing bowl, so I threw some plastic wrap over it and put the entire bowl in the fridge.
As I was on my way to the funeral, the sunny day that I had woken up to quickly became overcast, and as we drove to the gravesite after the service, the snow started falling in giant flakes. By the time we had buried the body (most people at the site performed the mitzvah of helping the family bury the body by shoveling dirt into the grave after the body is placed inside), we were standing in near whiteout conditions. The family's limo fishtailed as it left the cemetery, but they and the rest of us were okay. Since the storm was travelling eastward, I ended up driving all the way home in it. When I did get home, the one thing that helped settle me from the day's events was taking the remainder of the dough out of the fridge and rolling it up into cookies, pressing each one with a fork (as you do with peanut butter cookies).
I also noticed that, when I came back, the 18 cookies that had been baked had suddenly become 4. And the 18 I baked after that were consumed within 24 hours of leaving the oven.
So let me warn you know - these are comfort cookies that will bring you joy in your time of sorrow. They are also, simply put, highly addictive. Make sure you make a double batch, as I have to when I make them again this Saturday for UFC night. :)
Thursday, February 2, 2012
Saturday, October 1, 2011
The Trifecta Cheesecake Weekend (Part 2)
So when I last left you, dear Reader, you were going to try the incredible bacon and eggs cheesecake . And I had promised you that I made my 40-something friend an even better one.
But how can you improve upon such sinful goodness? By adding on a couple more sins to the mix.

But how can you improve upon such sinful goodness? By adding on a couple more sins to the mix.

Notice the difference in colour? It brings out the bacon (there is actually more bacon in the other cake, but the colour of this cake enhances the bacon bits). What could give a cream-coloured cheesecake such a tan-like colour? Sun lamp?
Remember when I said my friend and her husband were Irish? Now, far be it for me to stereotype people. My partner is half Irish and my son has a full Irish name. But really, the only thing that could make a bacon and eggs cheesecake better is to add alcohol to it. And not just any alcohol, but that most famous of Irish liqueurs used in cheesecakes worldwide.
Bacon and Bailey's Cheesecake
Follow the directions for the bacon and eggs cheesecake, except you add 3/4 cup (yes THAT much) of Bailey's to the mix just after you mix the eggs in. To make it even more decadent, melt a 2 oz square of baking chocolate, and allow it to cool but not solidify. After you add the bacon, and pour it into the pan, pour the chocolate on top and use a knife to swirl it in for a marble effect. (Yes I am trying to get Wilford Brimley to visit your house).
Bake this cake for 45-60 min, again doing the jiggle test after 35 min.
Normally, this size of cheesecake will serve about 6 - 8 people. But you will either refuse to share it or you will want to cut very small slices since it's so rich. If the latter, you're a better person than both my friend and I, who hid it away from the rest of her party.
The Trifecta Cheesecake Weekend (Part 1)
Hello world! It's been quite a while since I've been here. I would apologize, but life just seems to get in the way of things. Except when it comes to two things - bacon and cheesecake.
Honestly, I am not the biggest cheesecake fan. I really find it a rather bland dessert. But, much like sweet cream ice cream, the humble plain New York or Philly-style cheesecake can be a base to lead you to somewhere beyond the dessert universe.
And yet, I have many friends who would walk over their mothers for a good cheesecake. And who wouldn't hesitate to sell out their country's innermost secrets for bacon...mmmm...bacon.
A while ago I made bacon and eggs ice cream. It sounded intriguing. And the Bacon Master of the house, my son, couldn't get enough of it, and neither could his bacon-loving male relatives.

So I made a promise to my bacon-loving friend. As he and his lovely wife were looking for a house this past March, I said that when they bought a house, my housewarming gift to them would be a bacon and eggs cheesecake.
Well, they bought a house. They moved in June. They scheduled their housewarming for August. (Note to self: schedule a housewarming for myself sometime before I move.) So I had to think of a bacon and eggs cheesecake recipe, since, if you google it, well, that's probably how you happened upon this blog.
Unfortunately, they scheduled their housewarming on the day of my friend's 40th birthday. She is Irish. Her husband is Irish. They had an unlimited bar. Dilemma.
I had already committed to make the bacon and eggs cheesecake, and my soon-to-be 40something friend liked the sound of that as well. But I still wasn't sure how this was going to work.
You see, the caf at work (and if anyone from work is reading this, please don't run from the cheesecake recipe) has a breakfast special every Monday of toasted bagel with bacon and cream cheese. And it is fan-fucking-tastic. I have been eating that every Monday for 6 years, save the 6 months during my pregnancy where I had to forego bacon because it was a cured meat.
So if bacon and cream cheese worked, and bacon and eggs made wonderful ice cream, surely this cheesecake could not fail.

See for yourself. Here's the recipe:
Bacon and Eggs Cheesecake
6 strips applewood or maple-smoked bacon, thick or thin cut (not double smoked)
one dinner plateful of brown sugar (not golden - has to be brown and clumpy)
1 1/4 cups graham crumbs
1/4 c. melted unsalted butter
3 pkgs of cream cheese (full-fat - using half-fat is like having a Big Mac with a Diet Coke) (use Lactancia cream cheese if you can find it, since it's the best for baking)
3/4 c. white granulated sugar
3 eggs
1 tsp. vanilla extract
First things first - you need to make caramelized bacon. WARNING: this is like opening a crack lab in your house. It may sound repulsive, but once you try the end product, you will want to do nothing else for the rest of your days except make and eat caramelized (aka candied) bacon. You will yell at the oven to cook it faster. You will burn your tongue on melted sugar and bacon fat. You must summon all your willpower and ensure that you can make this without eating it.
To make caramelized bacon: preheat oven to 400 degrees F. Cover a regular-sized baking sheet with tin foil, and place a cooling rack on top of it. Take a piece of bacon and dip it in the brown sugar, packing on as much brown sugar onto the piece as will stay on it (don't worry, some always falls off). Place the piece on the rack, and continue until all 6 pieces are covered. Pack any leftover brown sugar onto the pieces as they sit on the rack.
Bake the pieces until the sugar has melted and the bacon is cooked, about 12 - 15 minutes, depending on thickness. Keep an eye out for burning sugar mixed with burning fat. You may have to change pans part way through, or open all the windows (and let your neighbours know what's going on? Never!). Once the bacon is done, take it out of the oven and let it cool completely until it is crispy and crackly (no pun intended). Put it aside.

Yes, you will have to put a big sign on it. Maybe hire some Vegan Security Guards to stand next to the plate while you make the rest of your cheesecake.
The cheesecake is quite simple. I posted a recipe earlier for my pumpkin cheesecake here , which you can use for the technique for the springform prep, the graham crust prep (though you will notice that I no longer add sugar to my graham crust. I find this enhances the flavour of the cheesecake more. Plus a little less sugar is a little longer that I keep Wilford Brimley out of my house), and the mixing of the cheesecake.
While you're baking your graham crust, take your crack, er, caramelized bacon, and cut it into teeny tiny little bits. Use a chef's knife (the heavy blade that looks like a full triangle), pile about four pieces on top of each other, and cut them in 1/8" strips following the short side. Then, cut these pieces in half along the length of the bacon (so that you have teeny bacon squares). Try to get them as small as possible. You're going for the artificial bacon bit look, not the breakfast strip bacon look.
Following the cheesecake method for the pumpkin cheesecake (using all white sugar for our recipe here), mix all ingredients together, but instead of adding spices and pumpkin flesh, you add the bacon bits just before you pour the mix into the springforms. How much bacon? Add by the handful and keep your eye on the mix - you can't really put too much, but remember, it's supposed to be bacon AND eggs cheesecake. Stir the bits in gently, until they look evenly distributed.
Bake following the pumpkin cheesecake method, but reduce the time to about 35 - 45 min. Check the cake after 30 min - jiggle it ever so slightly. If it runs like you just put it in, leave it for another 15 min. If it jiggles like cafeteria jello, then turn your oven off and leave the cake in with the oven door open until it can be removed without mitts.
WARNING: Your cake WILL crack a bit around the bacon bit pieces, like this:
It's OK. If you've allowed it to cool in the oven, then the little cracks won't develop into big ones.
Let me know how you like this one. I thought it was so nice that I made it twice that weekend. Once for my friends and once for me.
But what about your 40-something friend, you ask? Didn't you say this was a TRIFECTA cheesecake weekend?
Well I made her something special. REALLY special!!....(to be continued).
Tuesday, September 6, 2011
The easiest and yummiest Angel Food Cake. Period.
Apparently I'm known for making cheesecakes. Don't get me wrong. I love making cheesecakes and I like to live dangerously by never, ever ever, never ever ever using a water bath. The crust never stays crusty with a water bath, no matter how many layers of tin foil you wrap the springform in. The cake never tastes done. I don't care if it's the "only way" or the "professional" way. I'd much rather bake it at a lower temperature right on the damn rack. And I've figured out a way to avoid the crack.
But we're not here to talk about cheesecake. I haven't blogged since the Fall about my culinary creations. Not that I haven't made any. I've just been busy with the holidays and obsessing about the weight I gained before and after the holidays to blog about all the food I've made.
At least once a month we have our friends over for a UFC Fight Night. My male companion usually BBQs, even in the depths of winter, and I usually make the accompaniments, including (and always) the dessert. It's usually cheesecake, but on occasion, I have made the most awesome Vanilla Bean Ice Cream and Strawberry Shortcake and other things which I should have probably blogged about (and I might later, and when I do, I'll put links in this blog to take you to those ones).
But last weekend, since we're all on the "let's try not to kill ourselves with saturated trans fats before we turn 50" diet, and because I don't want to be known as "The Cheesecake Lady Junior" (my mom being the Cheesecake Lady Senior in her heyday), I gave my guests a choice for dessert. Thankfully, the majority chose an Angel Food Cake. Thankfully because (a) for the aforementioned reasons and (b) I had about 24 frozen egg whites that were taking up precious room for homemade ice cream (I went through a bit of a hollandaise obsession over the holidays - perfected my method, but many egg yolks sacrificed their never-to-be-a-baby-chick lives for the privilege of being poured over salmon and asparagus twice a week).
I searched high and low for a good Angel Food Cake technique (I know the recipe - egg whites, cake flour, sugar, and lots of freakin' air). Surprisingly, Rose Levy Berenbaum's book only had a Chocolate Angel Food Cake recipe. Since I found out one of my friends wasn't a big chocolate fan (the hard way after making double chocolate almond cheesecake for her anniversary), that was out. But I didn't want it to be just plain.
So I picked up a book I had always looked at but thought would be too hard for me to use: Regan Dailey's In The Sweet Kitchen. She had a lovely recipe for Poppyseed Angel Food Cake. Except after a rib dinner, the last thing people want to do for dessert is spend the entire time picking seeds out of their teeth. So I hemmed and hawed, and opened my spice cupboard to reveal: cinnamon (no, too strong), nutmeg (maybe, but a bit too savoury), cloves (WAY too strong), and cardamom. Cardamom, eh? Hmmm...

The picture says it all. I nearly forgot to take a picture for this blog, so it's the last piece left. Here's the entire recipe, with Regan Dailey's awesome mixing technique. I actually made a big mistake, but somehow it worked out. Once you try it, you'll never make an Angel Food Cake any other way again:
Cardamom Angel Food Cake
1 cup (unsifted) Cake & Pastry Flour (or just Cake Flour if you happen to have it). Do NOT use self-rising Cake & Pastry Flour. (why would you anyways?)
1 1/2 cups granulated or caster white sugar
1 tsp ground cardamom
1 1/2 liquid cups egg whites at ROOM temperature (you will NOT die)
2 Tbsp lukewarm water (tap is fine)
3/4 tsp cream of tartar
2 tsp vanilla extract
First things first - turn on your oven to 350 degrees F. Then clean your kitchen like you've never cleaned before. Make sure you can perform open heart surgery in the area where you will be making your cake.
Once your kitchen is clean, if you need to, separate your eggs (remember I took mine out of the freezer the night before and they were ready to be used by 11AM the next day. Yes THAT long!). Make sure that there is no speck of yolk, brown thingy, shell, or fetal chicken in your white, and for God's sake make sure you've used sterilized equipment for the whole process. (OK maybe not sterilized, as heated metal bowls may cook your egg whites, but make sure your mixing bowls are clean enough to use during your open heart surgery procedure.) If you don't know how to separate eggs, here's a trick I learned from a kid's cookbook: take a CLEAN teacup and saucer (like the fancy ones, yes.). Crack the egg onto the saucer, making sure the yolk stays whole and that no shell falls into the egg (use a piece of shell to take out other pieces of shell. It does work!). Then put the teacup over the yolk and tip the saucer over your clean bowl so the white falls out. When the white stops dripping, put the plate back on the counter, and voila - separated egg! 1 1/2 liquid cups of egg whites are about 10 - 12 egg whites. Make sure you leave them out to get to room temperature. If you stick your (clean) finger in the cup and you still feel a chill, wait. Trust me. Don't coddle them or use the microwave. Just wait. Go surf the web, update your Facebook status, have a couple glasses of wine, anything. Let nature take its course.
While you're waiting for your eggs to warm up, measure the flour, the cardamom, and all but 1/4 cup of the sugar into a sifter or large mesh strainer. Sift this mix three times. Yes, three times. Leave aside.
Take out your 10" aluminum tube pan, ungreased (don't use no-stick, you don't need to, but if you do, please turn down the temperature 25 degrees F), and keep it handy. Also, grab an empty wine bottle and make sure it is empty by overturning it in the sink to get the last drops out. Do NOT use a champagne bottle. Do NOT use a full bottle. It has to be empty. If you don't drink, then get yourself one of those empty bottles from Ikea. If you are waiting for your egg whites to warm up, then drive over to Ikea, buy a bottle out of the Marketplace, and come home. Your eggs should be warm by the time you get back (because nobody lives next door to Ikea. Nobody.).
Set up your stand or hand mixer and make sure the bowl is clean. Put your egg whites in the bowl, and put your mixer on HIGH/10/ultimate speed. When you start to see foam add the 2 Tbsp of water, and then put it back on HIGH until it turns to soft peaks (about 30 seconds in a stand mixer). Add the cream of tartar and then beat the mixture on HIGH again for another 20 seconds, then add the 1/4 cup of sugar. Beat until the egg whites are almost cardboard stiff (hard peaks).
Now here comes the fun part. Go wash your hands and dry them with a clean towel. Make sure you use warmish water. Remove the egg whites from the stand and sprinkle 1/4 of the flour mixture over the egg whites. Stick your hand in (DO IT) and gently but quickly fold the flour into the whites. It feels like you're folding a cloud. When you don't feel any more lumps, add the next 1/4 of flour, and continue by 1/4s until all the flour's been mixed in. If you're gentle enough, you will hardly deflate the whites. NOW use your hand to put the batter into the cake pan. Works way better than a rubber scraper.
Once you have scraped all the batter out of the bowl and into the pan, and off of your hands and into the pan, gently swirl a butter knife in the batter to get out any air pockets. DO NOT BANG THE PAN TO GET RID OF AIR BUBBLES. This ain't a pound cake or a cheesecake. You bang an angel food cake and it will fall faster than an anvil on the coyote's head.
Rinse your hands quickly and put the pan in the middle of the oven. Set your timer for 40 - 45 min, and leave the kitchen for at least 30 of those. Don't let anyone else in the kitchen. No dogs, no cats, no running children, no teenagers or spouses foraging for snacks. Don't run your dishwasher. Don't clean up yet. Just. Leave. Why? Because any slight and sudden vibration will MAKE THE CAKE FALL. You may think you're being gentle and quiet by washing the dishes, but unless your sink is at least 20 feet away from your oven, then just wait. Barracade the kitchen. If people go in, don't yell at them, just gently guide them out. Yelling can also make the cake fall (bad karma, loud noise). Think of the cake as a newborn baby that has cried for 72 hours straight and then finally fell asleep.
After 30 minutes, go turn on your oven light and take a look. The cake should have doubled in size and started to crack on the top a bit. It might even be browning. But DON'T OPEN THE DOOR. Tiptoe away from the oven for at least another 10 minutes.
Come back after those 10 minutes are up. If the top is golden brown and lovely, take a toothpick in one hand and, very carefully, open the door. If your kitchen is near a door or window that leads outside and it's winter when you make this cake, make sure that nobody opens the goddamn door while you do this. Firstly, lightly touch the top of the cake. If it springs back, just for insurance sake, stick the toothpick in and make sure it comes out clean. If it does, you're done. If the cake does NOT spring back, wait another 5 minutes and try again until it does.
Now here's the tricky part. Take your empty bottle and put it near the stove. Take the cake pan out of the oven. Tilt it on its side and stick the bottle in the hole in the tube pan. Invert the cake onto the bottle (it will hold) and leave it to cool upside down until the cake is room temperature.
Now you're looking at this page and saying, "Shit. I don't have a bottle. I forgot to get one, or I'm still drinking my wine." Well, you can use a colander. But it's not as much fun and it may take longer to cool your cake. Plus it won't freak people out the way a cake pan on a bottle does.
While the cake is cooling, make sure that nobody OPENS THE OUTSIDE DOOR OR WINDOWS. A draft will demolish all your hard work in the blink of an eye. If it's summer, you might be OK, but then you risk bees, flies, and other woodland creatures coming in and stealing your cake off the counter.
While your cake is cooling, you can make icing if you want. I used a whipped cream icing. Clean up all the stuff you used to make your cake, rinsing with very cold water. Fix the bowl and whisk attachment back onto your stand mixer. Take 2 cups of very cold whipping cream (35% cream) and pour it into the bowl. Add 2 Tbsp white sugar and 1 tsp of vanilla (if you want). Put it on HIGH/10 again. Watch it go. When it's just a little less firmer than the egg whites, stop the machine and put the bowl into the fridge until you're ready to ice your cake.
Once you can touch your cake pan with your bare hands and there is no warmth whatsoever (so about an hour), take it off the bottle. Take a sharp, thin knife (I use a boning knife - yes I know butchers and chefs. Get over it.) and run it along the side of the pan, and along the tube in the middle (between the tube and the cake). Turn the pan over, above a plate, and push down on the springform bottom. (Your tube pan isn't springform? Then you used a Bundt pan. You can still take it out, but you'll have to hit it very hard or get a scraper into the bowels of the pan to push the cake out.) Once the cake falls out onto the plate, run the same knife between the bottom of the tube and the cake. Lift up the bottom. There's your masterpiece! It should have about tripled in size.
If you have any problems with the cake, send me an email and let me know. If you have any successes, let me know too. Especially let me know your best techniques for chasing people quietly out of the kitchen while the cake was baking, because I could use some of those...
Thursday, October 21, 2010
Just acknowledge that I let you in, or why I hate the morning drive - A Poem
Just a little thank you is all it takes
A wave of the hand
A nod of the head
Just a teeny respectful gesture
After all,
I might have saved you from
A damaging sideswipe
A horrific driver’s side crash
An overturned vehicle
Or at the very least
Being late for work
Many of my other driving colleagues would not have been
So kind
As to leave a space for you
To sidle in
Every second we move
We change our Fate
I have just helped to change yours
Would it hurt you to acknowledge it?
Next time
You might not see me
Monday, October 18, 2010
The End of the Dishwasher
So my dishwasher finally shuffled off to that great appliance warehouse in the sky this weekend. And, as usual with my luck, it went right in the middle of the cycle, between “wash” and “rinse”, leaving my dishwasher full with mucky, obscured water.
Like anyone who has ever owned a dishwasher, even for a short period of time, I thought that this was the ultimate disaster. It was Sunday morning, I was gearing up to make French Toast and bacon for the kids, and we had no dishes left because I forgot to run the dishwasher the night before. It was already 9:30 AM and we had to be out of the house by 11. When you have 2 young kids, life is chaotic enough without having to deal with failing appliances.
As I opened the lukewarm dishwasher, and started to fill the sinks with blasting hot-as-my-hands-can-take-it-without-gloves water, I heard daddy and the kids downstairs screaming with laughter at whatever it was they were doing. And I got pissed. Because I knew, as mom, I would have to end up doing everything myself, as usual.
Once I unloaded the bottom rack into the sink, I heard the thumping of family feet coming up the stairs.
“We’re off to have a bath,” said Daddy, guiding the (little bit stinky to be honest) girl child up the stairs.
In the millisecond between the end of his statement and the next footfall on the stairs, a brainstorm crashed through to my eyeballs and came out of my mouth in the form of:
“WAIT!”
The house stopped. Here was my chance.
“Can you guys please come and help me dry these, since the dishwasher is dead?”
Daddy, being the helpful guy that he is, said, “Sure. I’ll just take her upstairs, and…”
“No,” I continued, my brilliant idea illuminating my face, “I mean the both of you.”
“Oh, sure,” said Daddy, in one of those parental mind-meld moments. He guided the (little bit stinky) girl child into the kitchen, and handed her a dish towel.
She looked at us as if we had given her a piece of chalk and asked her to illustrate the theory of travelling at the speed of light in less than 30 seconds.
I handed her a metal bowl, “You’ve never dried a dish before, have you?”
She shook her head. (She'll be 7 in January.)
“Well, it’s like when you dry your skin, except the water doesn’t come off as easily. So wipe this til you don’t see any more water, then put it in the cupboard where it goes.”
And for the next 20 minutes, I rinsed; they wiped. Then I wiped. And as we wiped together, I explained to the girl child that, “When Daddy and I were your age, we didn’t have dishwashers. We used to do dishes by hand, like this. And the whole family would have to pitch in and help put the dishes away.”
“This is fun!” the girl child explained, with all sincerity.
As I looked at my kitchen clock, I noticed that only 20 minutes had lapsed. We still had plenty of time for brunch, and a bath before we had to leave. And we had spent real quality time together. It’s funny how all of these appliances have come into our homes to make our lives simpler to give us “family time”, and yet, they seem to divide us further. The dishwasher would only run at night; it’s loud so we can’t talk over it, and we end up going downstairs to stare at the Idiot Box.
The only thing the dishwasher really gave me is more counterspace. Is that a substitute for family time? Not really.
Washing dishes together had us talking, was teaching the children how to handle breakable dishes when wet, and also, teaching that all-important “tidy up” lesson. That’s probably why they still teach dishwashing and linen washing at classic Montessori schools…
Never mind it saves electricity, water, and your dishes actually get clean, instead of having food particles melded to them by a hot dryer that never scrape off.
That being said, you’d think I’d never want another dishwasher again. You’d be wrong about that. After all, I don’t want to spend the time after a dinner party standing over the sink, washing dishes while everyone else gets to have a good time. But maybe we might not use the new one as often. Maybe.
Monday, October 11, 2010
So now we're in October
and I have been extremely bad about blogging. So much for "if I don't write every day..."
The Staycation went well, I suppose. Didn't really finish everything around the house until this weekend, but...
Anyway, so it's October. And as the baker I imagine that I am, I went out and spent way too much money on a "pie pumpkin", i.e. the wee pumpkins that they sell to insane people like me at an overinflated price because we believe that pumpkin from a can is sacrilege. You can buy 3 large jack-o-lantern pumpkins for $15, but a mini 5 lb pie pumpkin is $3. And all it gives you is enough pumpkin for 2 pies. Or one big pie. That's about 4 cups of pumpkin.
But you know, there is nothing in this world that can beat freshly roasted pumpkin flesh for baking. The stuff in a tin tastes like tin. And God knows how long it's been trapped in that tin. Centuries, maybe. Since the Great War. After all, canned food never goes bad so long as it isn't dented...
So now that I split my pumpkin, gutted it, and roasted it (I forgot to take pictures in my zeal of acting out my Dexter fantasies with a squash), I had no idea what to do with it. Pie - well I have a wonderful pumpkin pie recipe that I cannot share, as it was created by my late husband, and it wouldn't be right to share it without permission. Maybe in 70 years or so when it becomes Public Domain.
My next option was a pumpkin cheesecake. I was attending a Thanksgiving dinner, and I had to bring something. My hosts love my other cheesecakes (apparently I make good ones; I don't know since I'm not a big cheesecake fan. OK, that's not true. I love making cheesecakes. I don't really care if I eat them. But I love watching people enjoy what I bake.), so I thought, why not do a pumpkin one?
There are six million pumpkin cheesecake recipes on the internet. Most of them call for canned pumpkin. Most of them don't have enough of anything else to cover the flavour of the tin, though some did call for lemon juice which would kind of mask it.
Canned pumpkin mixes easily into the cheesecake batter. Freshly roasted and pureed pumpkin does not blend as easily. But believe me, it is well worth the effort! Plus, you can snack on seeds while it bakes.
Finally, I just decided that I've been making cheesecakes long enough that I don't need to follow a specific recipe. So I made one up. Some of my Facebook peeps asked me for the recipe, if it was a good one.
There were people at the Thanksgiving dinner eating cheesecake who normally don't. And funny enough, only men had my cheesecake during the first round of dessert (we had to leave before the second round. The good thing about having a small child is that it saves you from overstuffing yourself at a large dinner, simply because you're either chasing him around or you have to leave early to make sure he gets to bed on time). I take that as a sign that it was probably a good one.
So without further ado, here's my pumpkin cheesecake recipe, which I will call Ontario Harvest Pumpkin Cheesecake:
What you will need:
Equipment
1 - 9" springform pan (I don't like nonstick, but if you think teflon doesn't kill birds, then go for it)
parchment paper
solid measuring cups (as opposed to liquid measuring cups - there is no liquid to measure for this recipe)
measuring spoons
Food processor
Large cookie sheet
Stand mixer or hand mixer (unless you're batshit crazy and want to mix cream cheese by hand, then go for it)
rubber scraper (not plastic, rubber. You'll see why.)
toothpicks
Ingredients
1 whole pumpkin, preferably not jack-o-lanternized, gutted and cut in pieces, skin on.
2 cups of fine graham cracker crumbs
2 Tablespoons of white granular sugar
1/3 c. butter, melted (that is, measure the butter first and then melt it)
extra butter at room temperature
3 packages of Lactancia cream cheese (do not use Philly if you can possibly avoid it - Lactancia makes way better cream cheese for cheesecake, hands down. It's even better than the cream cheese from the cheese shop that I got one day to be fancy and spent way too much money on cream cheese for a cheesecake!)
Please make sure the cream cheese is room temperature. You will NOT die or get sick from room temperature dairy products, as long as they haven't been left in the room for 3 days straight, or in the hot 35 degree sun for 4 hours or something.
1/2 c. white granular sugar
1/2 c. brown sugar, packed tightly
3 eggs, room temperature (you leave them in the shells to bring them to room temperature. Don't just crack them and leave them out. You're just asking for trouble then.)
1 heaping teaspoon of cinnamon
1 teaspoon of freshly grated nutmeg
1 teaspoon of ground ginger (you can try fresh, but make sure it's grated as fine as possible, and make sure you use only 1/4 the amount of dried)
1/4 teaspoon of cloves
1/4 teaspoon of sea salt (for God's sake, don't tell me you're still cooking with iodized table salt!!)
2 teaspoons of vanilla extract, or the scrapings of half a vanilla pod
Technique
Preheat oven to 400 degrees F. (Don't ask me what it is in Celsius or Gas. I've never seen a Celsius stove in my life, and I live in Canada. I think most modern gas stoves have degrees on them, but if yours doesn't, I'm sure there's a way to find out what gas mark 400 degrees Fahrenheit is.)
Line a baking sheet with parchment paper. Place your cut pumpkin, skin side down, on top of the parchment on the cookie sheet. Bake (or rather, roast) for at least 30 min, longer if you have a larger pumpkin. The pumpkin is roasted when it starts to smell like Fall in your oven, and when a toothpick goes easily into the pumpkin flesh. Remove from oven and cool until you can handle the pieces without burning yourself.
Scoop the flesh away from the pumpkin and deposit into your food processor. Make sure to obey the fill line on the side. Process away until the pumpkin looks like baby food. You may have to start with pulses if the pieces are too big. But it will work.
Once you've finished turning your pumpkin flesh into mush, discard the skin, and reserve about 2 cups of pumpkin mush. If you have more than 2 cups total (and you will), you can freeze the rest (it lasts forever in the freezer, and it's hellabetter than canned) or you can make more cheesecakes!
So now turn your oven down to 350 degrees F. You don't have to open the door to cool it; the recipe takes long enough to prepare that your oven should cool down to the proper temperature.
Take your 9" springform pan and butter the sides. Even if it's non-stick. But just lightly. Then line it with parchment. You may swear since parchment is cut into rectangular and oblong shapes and springforms are usually round. Use the butter to help hold the parchment to the pan. Trim any extra, and make sure the folds are pressed well into the side of the pan. What? It's not holding? Yeah, it does that. So take a little more butter (just a bit, don't go Paula Deen on the pan or anything) and brush the inside of the parchment, using that to help the parchment stick to the bottom (most important) and sides (not as important, but necessary).
Once you've finished cursing me and the parchment, mix the graham crumbs, and white sugar that were grouped together in the list of ingredients. Use a pastry blender to make sure it's well-mixed. Then add the melted butter and use the pastry blender to make sure the butter is mixed thoroughly. It should look like coarse sand, and should only clump when you pick it up in your hand and clump it together, like sandcastle sand. If it is too wet, the bottom of your cheesecake will be greasy (remember all the butter on the parchment?). Take your graham mixture and dump it into the bottom of the springform. Press it into a flat circle following the pan's shape, making sure that it gets spread right to the edge of the pan (paper). Make it as even as you can while spreading it by patting, not pressing, the crumbs with the palm of your hand. Once it looks like an even circle, put the springform on a cookie sheet (the one from the pumpkin will do, as long as you've cleaned it up) and put it in the oven for about 5 - 7 minutes. Remove from the oven and cool.
After you bake the crust, take your 3 packages of cream cheese and put them in your stand mixer. Mix them on low (no higher than 4) to make sure that they whip nicely. The rubber scraper is your best friend here. Make sure you scrape down the sides AND in between the beater (I use the K beater, but you can use the whisk if you want a whippier cheesecake. The whisk is just a bitch to scrape.). Once the cream cheese is starting to smooth out, add the white sugar, and give a quick turn in the mixer (count to 3). Then add the brown sugar, and mix until the cream cheese is smooth, scraping down the sides all the way to make sure the sugars are being mixed in. You should barely notice the sugar; the cream cheese may look a little tan. Now add your pumpkin puree. Again, mix well on about low - medium low, making sure to keep using that rubber scraper. When the pumpkin is just blended in (so the whole thing isn't quite light orange), add one egg and mix. When that egg is fully mixed in, add the second. When that one is fully mixed, add the third. When that egg is fully mixed in, add the spices. All at once, it's ok. And the salt, too. Mix until you see that the spices are well-incorporated, then add the vanilla. Give your batter a good count-to-7 mix (yes this is how I cook), and then remove from your mixer. Scrape the batter off the beater, too.
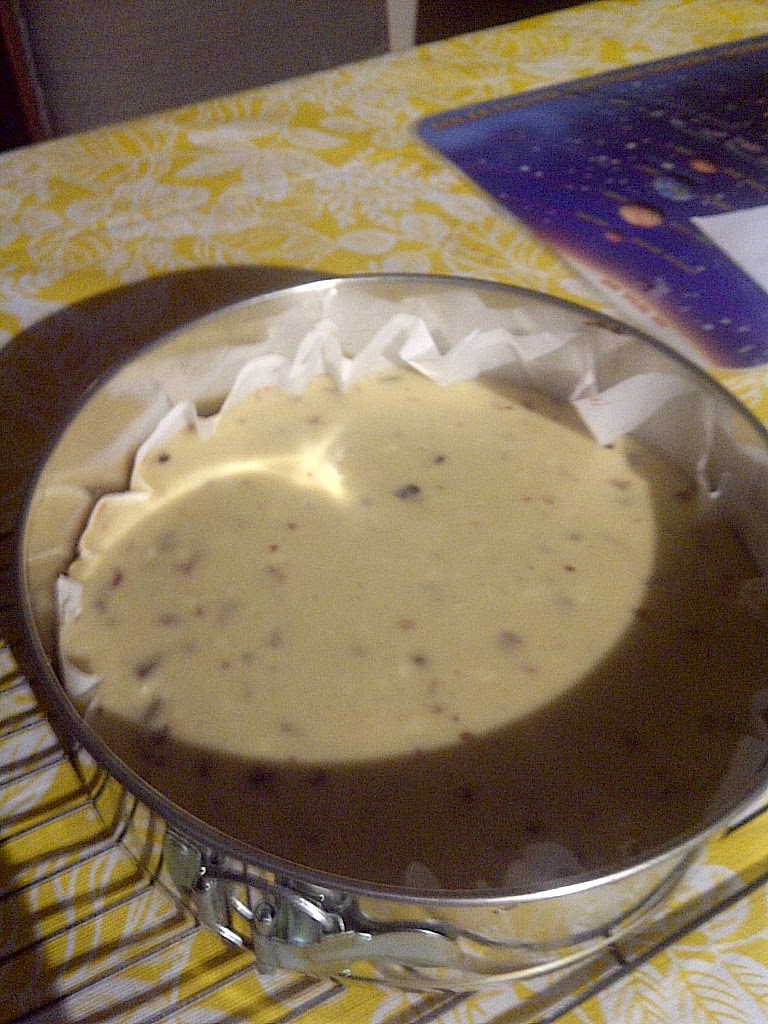
Now carefully pour the batter into the springform. If your parchment paper is uneven, and there are parts that did not touch the top of the pan, that's ok, as long as your paper is against the side. If the paper is poking away from the side, try not to fill the cheesecake higher than your shortest area of paper.
Give the pan a little tap and spin (tap it on the cookie sheet while turning it carefully in both hands), and then place it in the centre of the oven. Bake for at least 1 hour, and then check. If the cheesecake comes back nearly clean when a toothpick is inserted (there may be a bit of batter thinly on the sides of the pick), it's done. If it is still thick on the toothpick, leave it for another 15 minutes, and try again until it's done. Then turn off the oven and leave the cheesecake in there to cool.
Once the oven is cooled off, about 40 min, open the oven door slightly, and let the cheesecake cool until it can be taken out without oven mitts. This ensures that your cheesecake will not crack. Unless of course you leave your windows open while you bake, thus cooling off your kitchen and allowing a draft to enter the oven after the 40 minutes of cooling after you've spent all day working on this bloody cheesecake...note to self: never leave the windows open while baking...
Once you take it out of the oven, you can put it in the fridge in the springform, or you can remove the springform sides and the parchment from the sides by carefully peeling it down and cutting as close to the cake as possible, and then cover the cake in plastic wrap before putting it in the fridge. Make sure it stays refrigerated for at least 4 hours.
Well, there it is. Hope it turns out as well for you as it did for me. If you have any questions, or are finding it difficult to wade through the editorial comments, drop me an email or a tweet and I'll happily help you out.
Happy Thanksgiving!
The Staycation went well, I suppose. Didn't really finish everything around the house until this weekend, but...
Anyway, so it's October. And as the baker I imagine that I am, I went out and spent way too much money on a "pie pumpkin", i.e. the wee pumpkins that they sell to insane people like me at an overinflated price because we believe that pumpkin from a can is sacrilege. You can buy 3 large jack-o-lantern pumpkins for $15, but a mini 5 lb pie pumpkin is $3. And all it gives you is enough pumpkin for 2 pies. Or one big pie. That's about 4 cups of pumpkin.
But you know, there is nothing in this world that can beat freshly roasted pumpkin flesh for baking. The stuff in a tin tastes like tin. And God knows how long it's been trapped in that tin. Centuries, maybe. Since the Great War. After all, canned food never goes bad so long as it isn't dented...
So now that I split my pumpkin, gutted it, and roasted it (I forgot to take pictures in my zeal of acting out my Dexter fantasies with a squash), I had no idea what to do with it. Pie - well I have a wonderful pumpkin pie recipe that I cannot share, as it was created by my late husband, and it wouldn't be right to share it without permission. Maybe in 70 years or so when it becomes Public Domain.
My next option was a pumpkin cheesecake. I was attending a Thanksgiving dinner, and I had to bring something. My hosts love my other cheesecakes (apparently I make good ones; I don't know since I'm not a big cheesecake fan. OK, that's not true. I love making cheesecakes. I don't really care if I eat them. But I love watching people enjoy what I bake.), so I thought, why not do a pumpkin one?
There are six million pumpkin cheesecake recipes on the internet. Most of them call for canned pumpkin. Most of them don't have enough of anything else to cover the flavour of the tin, though some did call for lemon juice which would kind of mask it.
Canned pumpkin mixes easily into the cheesecake batter. Freshly roasted and pureed pumpkin does not blend as easily. But believe me, it is well worth the effort! Plus, you can snack on seeds while it bakes.
Finally, I just decided that I've been making cheesecakes long enough that I don't need to follow a specific recipe. So I made one up. Some of my Facebook peeps asked me for the recipe, if it was a good one.
There were people at the Thanksgiving dinner eating cheesecake who normally don't. And funny enough, only men had my cheesecake during the first round of dessert (we had to leave before the second round. The good thing about having a small child is that it saves you from overstuffing yourself at a large dinner, simply because you're either chasing him around or you have to leave early to make sure he gets to bed on time). I take that as a sign that it was probably a good one.
So without further ado, here's my pumpkin cheesecake recipe, which I will call Ontario Harvest Pumpkin Cheesecake:
What you will need:
Equipment
1 - 9" springform pan (I don't like nonstick, but if you think teflon doesn't kill birds, then go for it)
parchment paper
solid measuring cups (as opposed to liquid measuring cups - there is no liquid to measure for this recipe)
measuring spoons
Food processor
Large cookie sheet
Stand mixer or hand mixer (unless you're batshit crazy and want to mix cream cheese by hand, then go for it)
rubber scraper (not plastic, rubber. You'll see why.)
toothpicks
Ingredients
1 whole pumpkin, preferably not jack-o-lanternized, gutted and cut in pieces, skin on.
2 cups of fine graham cracker crumbs
2 Tablespoons of white granular sugar
1/3 c. butter, melted (that is, measure the butter first and then melt it)
extra butter at room temperature
3 packages of Lactancia cream cheese (do not use Philly if you can possibly avoid it - Lactancia makes way better cream cheese for cheesecake, hands down. It's even better than the cream cheese from the cheese shop that I got one day to be fancy and spent way too much money on cream cheese for a cheesecake!)
Please make sure the cream cheese is room temperature. You will NOT die or get sick from room temperature dairy products, as long as they haven't been left in the room for 3 days straight, or in the hot 35 degree sun for 4 hours or something.
1/2 c. white granular sugar
1/2 c. brown sugar, packed tightly
3 eggs, room temperature (you leave them in the shells to bring them to room temperature. Don't just crack them and leave them out. You're just asking for trouble then.)
1 heaping teaspoon of cinnamon
1 teaspoon of freshly grated nutmeg
1 teaspoon of ground ginger (you can try fresh, but make sure it's grated as fine as possible, and make sure you use only 1/4 the amount of dried)
1/4 teaspoon of cloves
1/4 teaspoon of sea salt (for God's sake, don't tell me you're still cooking with iodized table salt!!)
2 teaspoons of vanilla extract, or the scrapings of half a vanilla pod
Technique
Preheat oven to 400 degrees F. (Don't ask me what it is in Celsius or Gas. I've never seen a Celsius stove in my life, and I live in Canada. I think most modern gas stoves have degrees on them, but if yours doesn't, I'm sure there's a way to find out what gas mark 400 degrees Fahrenheit is.)
Line a baking sheet with parchment paper. Place your cut pumpkin, skin side down, on top of the parchment on the cookie sheet. Bake (or rather, roast) for at least 30 min, longer if you have a larger pumpkin. The pumpkin is roasted when it starts to smell like Fall in your oven, and when a toothpick goes easily into the pumpkin flesh. Remove from oven and cool until you can handle the pieces without burning yourself.
Scoop the flesh away from the pumpkin and deposit into your food processor. Make sure to obey the fill line on the side. Process away until the pumpkin looks like baby food. You may have to start with pulses if the pieces are too big. But it will work.
Once you've finished turning your pumpkin flesh into mush, discard the skin, and reserve about 2 cups of pumpkin mush. If you have more than 2 cups total (and you will), you can freeze the rest (it lasts forever in the freezer, and it's hellabetter than canned) or you can make more cheesecakes!
So now turn your oven down to 350 degrees F. You don't have to open the door to cool it; the recipe takes long enough to prepare that your oven should cool down to the proper temperature.
Take your 9" springform pan and butter the sides. Even if it's non-stick. But just lightly. Then line it with parchment. You may swear since parchment is cut into rectangular and oblong shapes and springforms are usually round. Use the butter to help hold the parchment to the pan. Trim any extra, and make sure the folds are pressed well into the side of the pan. What? It's not holding? Yeah, it does that. So take a little more butter (just a bit, don't go Paula Deen on the pan or anything) and brush the inside of the parchment, using that to help the parchment stick to the bottom (most important) and sides (not as important, but necessary).
Once you've finished cursing me and the parchment, mix the graham crumbs, and white sugar that were grouped together in the list of ingredients. Use a pastry blender to make sure it's well-mixed. Then add the melted butter and use the pastry blender to make sure the butter is mixed thoroughly. It should look like coarse sand, and should only clump when you pick it up in your hand and clump it together, like sandcastle sand. If it is too wet, the bottom of your cheesecake will be greasy (remember all the butter on the parchment?). Take your graham mixture and dump it into the bottom of the springform. Press it into a flat circle following the pan's shape, making sure that it gets spread right to the edge of the pan (paper). Make it as even as you can while spreading it by patting, not pressing, the crumbs with the palm of your hand. Once it looks like an even circle, put the springform on a cookie sheet (the one from the pumpkin will do, as long as you've cleaned it up) and put it in the oven for about 5 - 7 minutes. Remove from the oven and cool.
After you bake the crust, take your 3 packages of cream cheese and put them in your stand mixer. Mix them on low (no higher than 4) to make sure that they whip nicely. The rubber scraper is your best friend here. Make sure you scrape down the sides AND in between the beater (I use the K beater, but you can use the whisk if you want a whippier cheesecake. The whisk is just a bitch to scrape.). Once the cream cheese is starting to smooth out, add the white sugar, and give a quick turn in the mixer (count to 3). Then add the brown sugar, and mix until the cream cheese is smooth, scraping down the sides all the way to make sure the sugars are being mixed in. You should barely notice the sugar; the cream cheese may look a little tan. Now add your pumpkin puree. Again, mix well on about low - medium low, making sure to keep using that rubber scraper. When the pumpkin is just blended in (so the whole thing isn't quite light orange), add one egg and mix. When that egg is fully mixed in, add the second. When that one is fully mixed, add the third. When that egg is fully mixed in, add the spices. All at once, it's ok. And the salt, too. Mix until you see that the spices are well-incorporated, then add the vanilla. Give your batter a good count-to-7 mix (yes this is how I cook), and then remove from your mixer. Scrape the batter off the beater, too.
Now carefully pour the batter into the springform. If your parchment paper is uneven, and there are parts that did not touch the top of the pan, that's ok, as long as your paper is against the side. If the paper is poking away from the side, try not to fill the cheesecake higher than your shortest area of paper.
Give the pan a little tap and spin (tap it on the cookie sheet while turning it carefully in both hands), and then place it in the centre of the oven. Bake for at least 1 hour, and then check. If the cheesecake comes back nearly clean when a toothpick is inserted (there may be a bit of batter thinly on the sides of the pick), it's done. If it is still thick on the toothpick, leave it for another 15 minutes, and try again until it's done. Then turn off the oven and leave the cheesecake in there to cool.
Once the oven is cooled off, about 40 min, open the oven door slightly, and let the cheesecake cool until it can be taken out without oven mitts. This ensures that your cheesecake will not crack. Unless of course you leave your windows open while you bake, thus cooling off your kitchen and allowing a draft to enter the oven after the 40 minutes of cooling after you've spent all day working on this bloody cheesecake...note to self: never leave the windows open while baking...
Once you take it out of the oven, you can put it in the fridge in the springform, or you can remove the springform sides and the parchment from the sides by carefully peeling it down and cutting as close to the cake as possible, and then cover the cake in plastic wrap before putting it in the fridge. Make sure it stays refrigerated for at least 4 hours.
Well, there it is. Hope it turns out as well for you as it did for me. If you have any questions, or are finding it difficult to wade through the editorial comments, drop me an email or a tweet and I'll happily help you out.
Happy Thanksgiving!
Subscribe to:
Posts (Atom)